Introduction
Using Oracle SQL Developer 20.5 or higher we can migrate Microsoft SQL server database to Oracle Autonomous database 19c on Oracle Cloud Infrastructure. Migration time depends on Size of source SQL server database and the network bandwidth between the source and Oracle Cloud Autonomous database. Oracle recommends to use Fast Connect between On-Premises and Oracle cloud.
Architecture
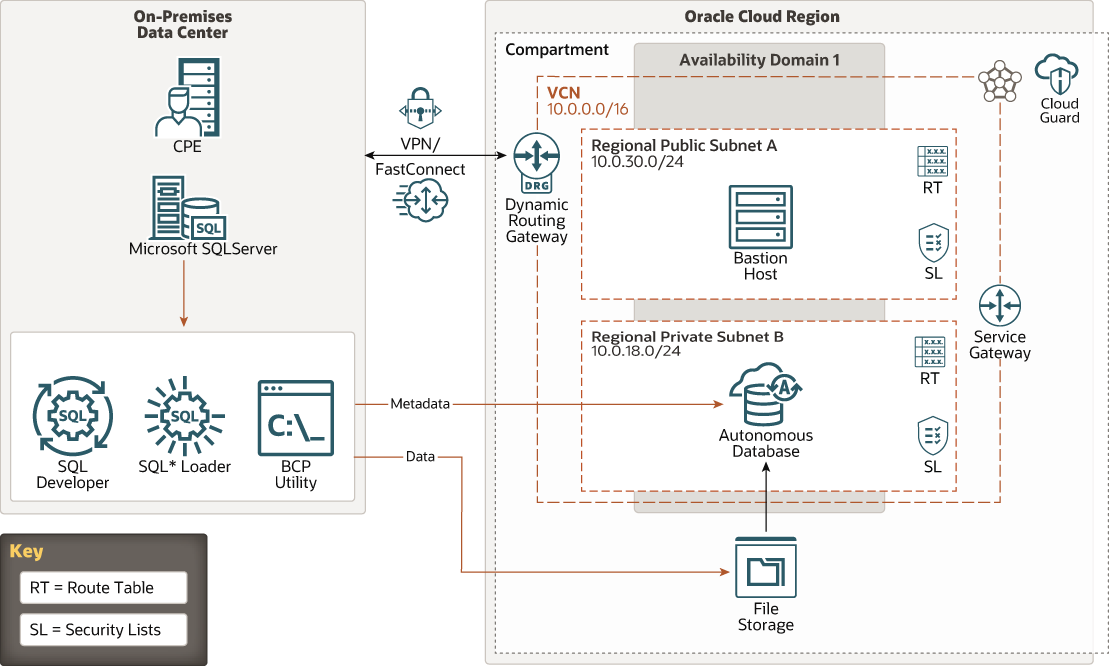
This architecture uses Oracle Cloud Infrastructure File Storage to migrate data from an on-premises Microsoft SQL Server deployment to an Oracle Autonomous Data Warehouse. The architecture is similar when migrating from another cloud service provider to Oracle Cloud. Oracle Cloud Infrastructure FastConnect or IPSec VPN provides private connectivity between your on-premises data center or cloud service provider and Oracle Cloud Infrastructure (OCI).
After migrating the data to OCI, you can use the built-in machine learning, analytics, and AI tools to run complex queries across multiple data types, and build sophisticated analytical models.
- Data scientists can use Oracle Cloud Infrastructure Data Catalog to explore, discover, and analyze data.
- Business analysts can access and visualize information.
- Developers can build data-driven applications.
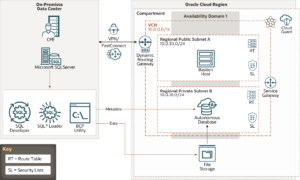
List of Components in this Architecture
On-Premises Components
- Customer-premises equipment (CPE)
- Microsoft SQL Server
- Oracle SQL Developer
- SQL Loader
- Bulk Copy Program (bcp)
OCI Components
- Region
- Compartment
- Cloud Guard
- Availability domain
- Virtual cloud network (VCN) and subnets
- FastConnect
- Dynamic routing gateway (DRG)
- Service gateway
- Route table
- Security list
- Bastion host
- Autonomous database
- File storage
Required Services and Roles
Services
- Oracle Cloud Infrastructure
- Oracle SQL Developer
- Microsoft SQL Server Administrator
- JDBC Java Database drivers
- (Optional) Oracle Cloud Infrastructure File Storage
Roles
| Service Name: Role | Required to… |
| Oracle Cloud Infrastructure: Admin | Provision and setup resources. |
| Oracle SQL Developer: db_datareader user on source Microsoft SQL Server Database system, mwrep user on target Oracle Database system | Export the data from Microsoft SQL Server and save it to Oracle Cloud Infrastructure File Storage, load and migrate objects and data to the Oracle autonomous database. |
| Microsoft SQL Server: db_owner user | Switch SQL Server Database to ReadOnly mode. |
| Oracle Cloud Infrastructure File Storage: Admin | Create a file system and store the exported data from the Microsoft SQL Server database. |
Prepare for Migration
Before migrating, provision an Oracle Autonomous Database instance on Oracle Cloud Infrastructure according to size requirements of the source MS SQL Server database, then install and configure Oracle SQL Developer.
Provision an Autonomous Database on Your Cloud Instance
Perform the following prerequisite steps as necessary:
- Open the Oracle Cloud Infrastructure Console.
- From the left navigation menu click Oracle Databaseand then, depending on your workload click Autonomous Data Warehouse, Autonomous JSON Database, or Autonomous Transaction Processing. This example uses Autonomous Data Warehouse.
- Choose your region.
- Choose your Compartment.
- Click Create Autonomous Database.
- Provide basic information for the Autonomous Database.
- Choose a compartment.
- Display name: Specify a user-friendly description or other information that helps you easily identify the resource. The display name does not have to be unique.
- Database name: Specify the database name; it must consist of letters and numbers only. The maximum length is 14 characters. The same database name cannot be used for multiple Autonomous Databases in the same tenancy in the same region.
- Choose a workload type. To create Autonomous Data Warehouseinstance, select Data Warehouse from the choices.
- Choose a deployment type.
- Select Shared Infrastructureto create your instance on Shared Exadata Infrastructure.
- Configure the database.
- Always Free: Select to show Always Free configuration options.
- Choose database version: Select the database version. The available database version is 19c.
- With Always Free selected, the available database versions are: 19c and 21c.
- OCPU Count: Specify the number of CPU cores for your database.
- Storage (TB): Specify the storage you wish to make available to your database, in terabytes.
- Auto Scaling: By default auto scaling is enabled to allow the system to automatically use up to three times more CPU and IO resources to meet workload demand. If you do not want to use auto scaling then deselect this option to disable auto scaling.
- Create administrator credentials. Set the password for the Autonomous Data WarehouseAdmin user.
- Username: This is a read only field.
- Password: Set the password for the Autonomous Data WarehouseAdmin user.
- Confirm password: Enter the same password again to confirm your new password.
- Choose network access.
- Allow secure access from everywhere: By default all secure connections are allowed from everywhere. To restrict access configure an access control list (ACL). To add an ACL for the Autonomous Database, select Configure access control rules.
- Virtual cloud network: This option assigns a private endpoint, private IP and hostname, to your database inside your VCN. Specify this option if you want your database to be accessible only within your VCN using a private endpoint; this option allows you to restrict access to an Autonomous Data Warehouse
- Choose a license type
- Bring Your Own License
- My organization already owns Oracle Database software licenses. Bring my existing database software licenses to the database cloud service.
- License Included
- Subscribe to new database software licenses and the database cloud service.
- Bring Your Own License
- (Optional) Provide up to 10 maintenance contacts.
-
- Click Add Contactand in the Contact Email field, enter a valid email address. To enter multiple Contact Email addresses, repeat the process to add up to 10 customer contact emails.
- (Optional) Click Show Advanced Options to select from the advanced options:
- Encryption Key
- Encryption using Oracle-managed keys: By default Autonomous Database uses Oracle-managed encryption keys. Using Oracle-managed keys, Autonomous Database creates and manages the encryption keys that protect your data and Oracle handles rotation of the TDE master key.
- Encrypt using customer-managed keys: If you select customer-managed keys, a master encryption key in the Oracle Cloud Infrastructure Vaultis used to generate the TDE master key on Autonomous Database.
- Tags: If you want to use Tags, enter the TAG KEYand VALUE. Tagging is a metadata system that allows you to organize and track resources within your tenancy. Tags are composed of keys and values which can be attached to resources.
-
- Click Create Autonomous Database.
Install Oracle SQL Developer
- Download Oracle SQL Developer onto the Source SQL Server host windows system.
- Unzip the file to install SQL Developer.
- Create a SQL Developer Connection to the Oracle Autonomous Database provisioned earlier as an admin user and save the connection.
- Download and configure JDBC Drivers to connect SQL Developer to MS SQL Server database.
- Download and unzip the zip file onto Windows host system into your working directory (for example, wkdir).
- Download and install Oracle Instant Client for Microsoft Windows for command-line execution.
- (Optional) For very large SQL server databases, it is recommended to provision Oracle Cloud Infrastructure File Storage as NFS storage to stage all of the SQL server data export files. Typically, set wkdirto the NFS mount.
Configure the Users and Environment
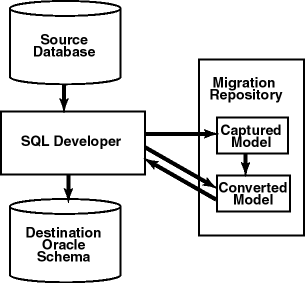
The Migrations Repository is a database schema that stores the metadata collected and transformed in the migration process.
Create a User for the Migration
Create a user for the migration.
- Log into the Autonomous Database as an admin user.
- Create a migration repository user for the migration metadata and grant the user unlimited space quota for metadata.
This example uses the user mwrep.
SQL> CREATE USER MWREP
IDENTIFIED BY Welcome112233
DEFAULT TABLESPACE DATA
TEMPORARY TABLESPACE TEMP;
ALTER USER MWREP QUOTA UNLIMITED on DATA;
- Grant permissions to the mwrep
SQL> GRANT
CONNECT,
RESOURCE,
CREATE SESSION,
CREATE VIEW,
CREATE MATERIALIZED VIEW
TO mwrep;
Create the Migration Repository
To convert the Microsoft SQL Server database to Oracle, create a repository to store the required repository tables and PL/SQL packages and create an SQL Developer connection to the mwrep user.
- In the Oracle Cloud Console, click the Connections tab, right-click Connections, then select New Connection.
A New / Select Database Connection window will appear.
- Complete the following fields for the connection in the New / Select Database Connectionwindow
- Name: Enter mwrep_adb(or the name that identifies your connection).
- Database Type: Select Oracle.
- Authentication Type: Select Default.
- Username: Enter mwrep.
- Password: Enter the password, then select Save Password.
- Connection Type : Select Cloud Walletfrom the drop down menu.
- Configuration File: Browse to where the autonomous wallet zip file is saved and select the wallet_adbName.zip file.
When the zip file is entered, the default database service is automatically populated.
- Click Test to test the connection.
Verify that the status of the connection on the lower left side of the page shows Status: Success.
- Click Save to save the connection, then close the window.
The connection is saved and it is listed under Connections in the Connections tab.
- Verify that you have the following connections listed in the Connections
- admin_adb
- mwrep_adb
- SQL Server 2016
- Right-click the mwrep_adbconnection, select Migration Repository, then select Associate Migration Repository.
- Click OK.
Capture a Snapshot of the Microsoft SQL Server Database
Use the SQL Developer Migration Wizard to capture a “snapshot” that includes the Microsoft SQL Server database metadata and data.
As part of the offline migration, it is recommended to quiesce all applications connected to MS SQL Server or switch SQL Server Database to ReadOnly mode in order to capture a consistent state of database.
- Introduction: Select Tools , Migration , then Migrate.
The migration wizard will walk you through the steps to convert SQL Server databases to Oracle.
- Repository: Select a connection for the migration repository. Select the mwrep_adbconnection, then click Next.
- Project:Provide a Name for the project and specify the Output Directory (typically wkdir where zip was unzipped). Click Next.
A Project is a container for the migration entities.
- Source Database:Provide the Source Database details and accept all defaults. By default, the Mode is Online and the Connection is SQL 2016. Click Next.
- Capture:Select the AdventureWorks database for definition capture, then click Next.
- Convert:Specify the conversion options. You can add a new rule. Click Next.
- Translate:Select SQL Objects to translate. The tool automatically selects sql Click Next.
- Target Database:Provides the Target Database details. For the Mode, select Offline. You can select to drop the target objects here. Save the Generated Script Directory location, typically wkdir\ProjectName\generated\YYYY-MM-DD_HH-MM-SS Click Next.
- Move Data:Provides details about the Data Move. The Mode should be Offline. Save the location of the Data Move Script Directory, typically wkdir\ProjectName\datamove\YYYY-MM-DD_HH-MM-SS Click Next.
- Summary: Provides a summary of the entire Project. Save the details. To make modifications, click Back. Click Finish.
The Database Migration Status box appears.
Create the Oracle Database Objects
Oracle SQL Developer Migration Workbench generates DDL statements to create the Oracle Autonomous Database objects based upon the Converted Model objects. Running the DDL statements will result in the creation of the objects in the Oracle Autonomous Database. You can use the SQL Developer or the sqlplus command-line to execute the sql scripts to create the SQL Server converted objects on Oracle Autonomous Database.
- Review the “Generated Script Directory” for the desired outputs.
- Use Windows File Explorer, Windows command, or Windows powershell to navigate to the Generated Script Directory.
Typically, it’s located in the wkdir directory that was defined during the install of the mssqlservermigration.zip file.
-
- Expand the wkdir directory tree.
The directory should look similar to the following:
Wkdir
[projectName]
datamove
generated
YYYY-MM-DD_HH-MI-SS
-
- Open the date and time stamped directory, you should see following oracle sqlscripts:
dropallschemas.sql
master.sql
passworddefinition.sql
reportallstatus.sql
- Create the SQL Server converted objects on Oracle Autonomous Database by executing sqlscript either through sql developer or straight sqlplus command-line interface.
- To use SQL Developer to create the SQL Server converted objects on Oracle Autonomous Database, execute the sqlscripts:
- Select admin_adbfrom the drop-down on the right icon. Then click Run Script (F5).
- (Optional) Run following SQL query to view the new Oracle Schemas created as a result of conversion process.
- To use SQL Developer to create the SQL Server converted objects on Oracle Autonomous Database, execute the sqlscripts:
CopySQL> select * from dba_users where created > sysdate – 1;
-
- To use the sqlpluscommand-line to create the SQL Server converted objects on Oracle Autonomous Database:
- Execute sqlto create the metadata and schema structure.
- To use the sqlpluscommand-line to create the SQL Server converted objects on Oracle Autonomous Database:
Copy$ sqlplus admin/[password]@atpdb_tp @master.sql
-
- Create a Schema Validate Status report by running sql.
Copy$ sqlplus admin/{password]@atpdb_tp @reportallstatus.sql
This produces an output file for each schema, in this case 7 log files. Review to make sure that there are no errors and that all objects are showing a VALID status.
At this point, the process has converted MS SQL Server Database AdventureWorks database to an Oracle Database structure on Oracle Autonomous Database. The conversion process created 7 new schemas on Oracle:
- ADVENTUREWORKS
- SALES_ADVENTUREWORKS
- PERSON_ADVENTUREWORKS
- PURCHASING_ADVENTUREWORKS
- EMULATION
- HUMANRESOURCES_ADVENTUREWORKS
- PRODUCTION_ADVENTUREWORKS
Migrate the Data
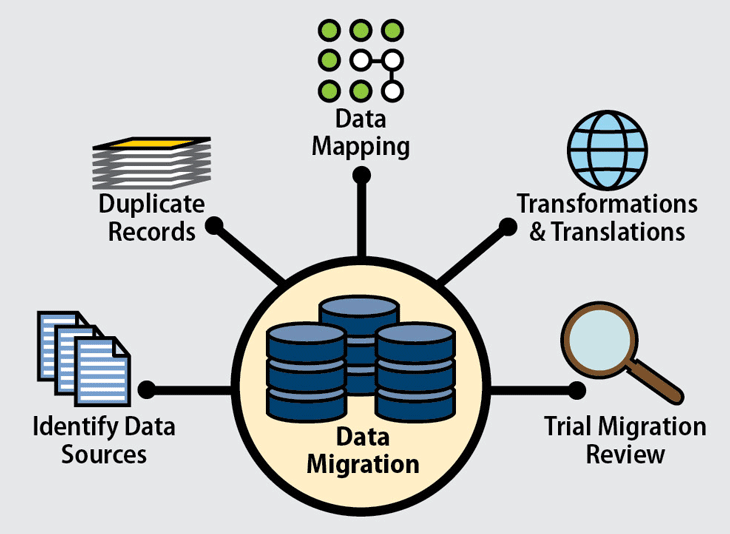
You can migrate the data in one of two ways: online or offline.
- Online Data Move: You can create a connection from within Oracle SQL Developer to your Microsoft SQL Server source database and migrate the data.
- Offline Data Move: You can export the data from Microsoft SQL Server. SQL Developer will create a series of BCP and sqlldrfiles that you can run from a batch file.
Online data moves are suitable for small data sets, whereas offline data moves are useful for moving large volumes of data. Furthermore, in cases of large volumes of data, it is recommended to use Oracle Cloud Infrastructure File Storage to help overall performance of data movement during migration process.
Migrate the Data Offline
During the capture process, the offline data move script would have been generated and the data would have been extracted into the project output directory named datamove. The execution of these scripts is what migrates the data from sql server windows host machine to Oracle Autonomous Database.
The datamove directory should look like this:
Wkdir
projectName
datamove
YYYY-MM-DD_HH-MI-SS
AdventureWorks
Inside the AdventureWorks directory, you should see six subfolders that correspond to all users under SQL Server AdventureWorks database.
You should see the following directories in the AdventureWorks folder:
- ADVENTUREWORKS
- SALES_ADVENTUREWORKS
- PERSON_ADVENTUREWORKS
- PURCHASING_ADVENTUREWORKS
- HUMANRESOURCES_ADVENTUREWORKS
- PRODUCTION_ADVENTUREWORKS
You should see the following files in the AdventureWorks folder:
- MicrosoftSQLServer_data.bat
- MicrosoftSQLServer_data.sh
- oracle_external.bat
- oracle_external.sh
- oracle_loader.bat
- oracle_loader.sh
The script MicrosoftSqlServer_data.bat is the master Windows system batch script that calls other batch scripts created within each of the schema directories. Here is sample execution:
- Launch the batscript on the source Windows system prompt. At the prompt, change to the directory and enter the Windows server hostname, Windows system administrator account (usually sa), and the SA password.
Copyprompt> cd “C:\_rkd\_OCI\DB-Migration\Non-Oracle\MS-SQL\wkdir\Capture\sqladvworks4\datamove\YYYY-MM-DD_HH-MI-SS\AdventureWorks\“
prompt> MicrosoftSQLServer_data.bat sql-server-hostname sa sa-password
During the above execution, the respective logs are generated for each database table by schema and stored in each of the schema folders under subdirectory log.
- (Optional) Review these logs either during the migration of data or after the completion, and validate the data movement. It is highly recommended to review the logs and validate the data migration.
Test the Migration
Depending on the complexity of the database being migrated, a large part of the migration project might be testing.
Oracle does not provide any tools that can automatically validate a migrated database for you. This phase of the migration should be planned and taken into account before the migration begins. The following should be part of your project plan:
- Verify the database structure.
- Verify the database security.
- Verify the data.
- Verify the logical correctness of views.
- Test the applications.
If you need any help with your Application workloads on Oracle Cloud Infrastructure (OCI) , Please contact us here. Our Oracle EBS and OCI experts will contact you promptly.
