Oracle continues to innovate and release a number of new features in Oracle EPM Cloud. One such feature is Auto Predict within Oracle EPM Suite’s Planning and Budgeting Cloud Service. With Auto Predict, administrators can define a prediction to predict future performance based on historical data and schedule a job to run that prediction definition, automating the prediction process.
EPM Oracle’s Auto Predict uses the same forecasting and statistical methods as Predictive Planning, but unlike Predictive Planning, you aren’t limited to running a prediction on a form. You can predict values for thousands of cells at once, when needed, by scheduling a job, and automatically write prediction results to a scenario/version—in the same cube or in a different cube from the historical data. You can also include Best and Worst Case prediction results. When you run the prediction, historical data for each member in the Auto Predict definition is retrieved and then analyzed using time series forecasting techniques to predict the future performance for these members.
Tips and Considerations:
- Auto Predict works with PBCS Oracle Standard and EPM Enterprise applications for Custom and Module application types when Hybrid Essbase is enabled. For legacy applications, Auto Predict works with the Enterprise application type when the Essbase version is upgraded to the version that supports Hybrid Essbase and Hybrid Essbase is enabled.
- Auto Predict works with custom time periods in Planning and alternate time periods in Planning modules – for example in Financials you can predict at both a weekly level and at a monthly level in the same application.
- Prediction results are more accurate the more historical data you have. There should be at least twice the amount of historical data as the number of prediction periods.
Steps to create Auto Predict definition:
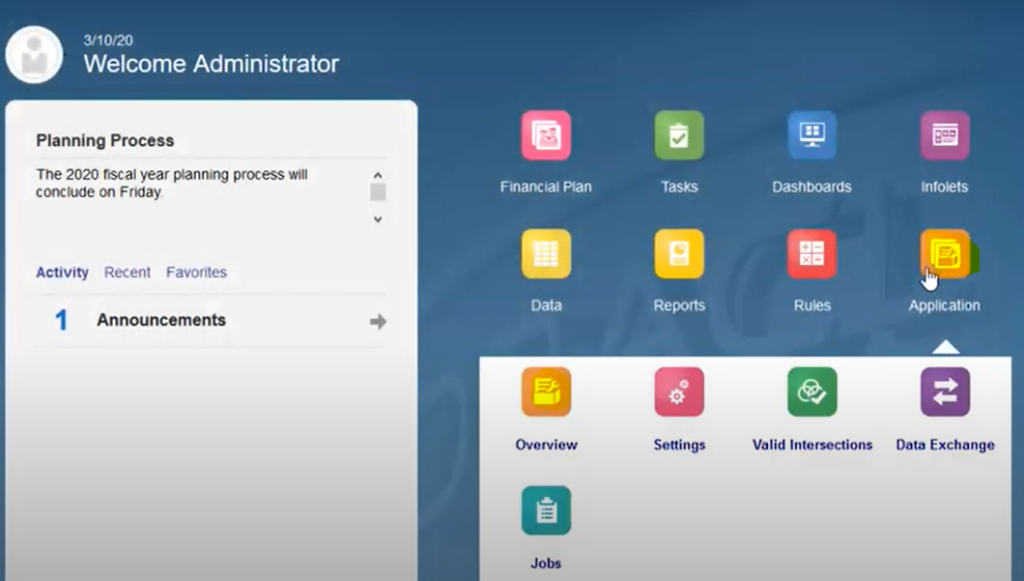
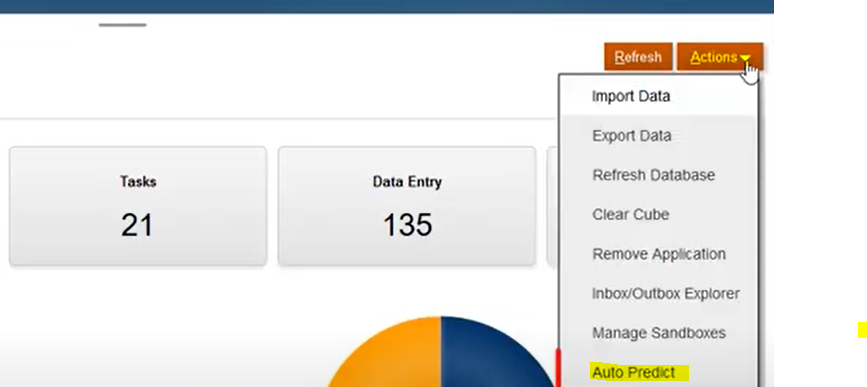
Step 1: From the Home page of Oracle PBCS, click Application, then click Overview, and then from the Actions menu, select Auto Predict.
Step 2: On the Auto Predict page, click Create.

Step 3: Enter a name and a description for the Auto Predict definition.

Step 4: From the Select Cube list, select the cube that contains the historical data. This cube is also used to store prediction results. If you want to store prediction results in a cube other than the cube with the historical data, select Cube to Cube. The Source cube is typically an ASO cube (although BSO cubes are supported). The Prediction cube can be an ASO cube or a BSO cube.
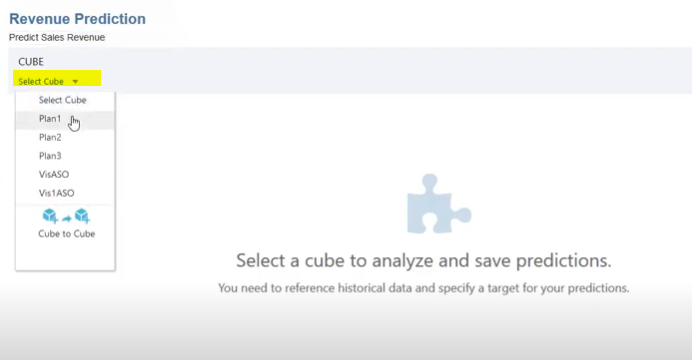
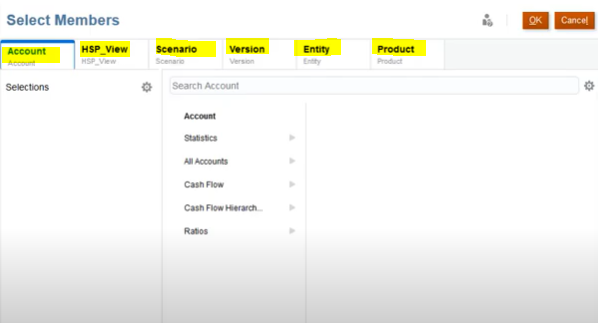
Step 5: Define the slice of data for analysis (where the historical data is), and then define the slice of data to store the prediction results.
- In the Analyze section, define the slice of data for the historical data source by selecting members for each dimension.
- In the Predict section, define the slice of data to store the prediction results for the base prediction by selecting members for each dimension.
How to select members?
- Click a member in the Analyze section to open the Member Selector.
- You can select members for each mapped dimension by selecting the dimension from the Dimension list in the Member Selector.
- After selecting members for mapped dimensions, click OK. Then click a member of an unmapped dimension and select members for each unmapped dimension.
- For the Analyze section, you can select single members or multiple members. You can select by member, or select by member functions or substitution variables.
- In the Predict section, members are pre-selected with the members selected in the Analyze Click a member in the Predict section to open the Member Selector if you need to change the selection. For example, for the Scenario dimension, change the member from Actual to Forecast.
- In the Predict section, you can change the member selections only if there is a single member selected in the Analyze Multiple member selections are common to both Analyze and Predict.
- Unmapped dimensions can be defined using single members only.
- Select members using these guidelines. Predictions using other combinations would require writing results to read-only cells or take too long:
- In the Analyze section, where historical data is, select members with these combinations of data storage and cube type:
- BSO—Store and Shared members.
- ASO—Any member without a member formula, and for account dimension, only leaf level members (level 0 members)
- In the Predict section, where you want to perform predictions, select members with these combinations of data storage and cube type:
- BSO or ASO—Store/Never Share
Step 6: In the Analyze section, specify how much historical data you have. Click Last 3 Years, the default, and slide the slider to the number of years of historical data you want to use in the prediction, up to a maximum of five years.
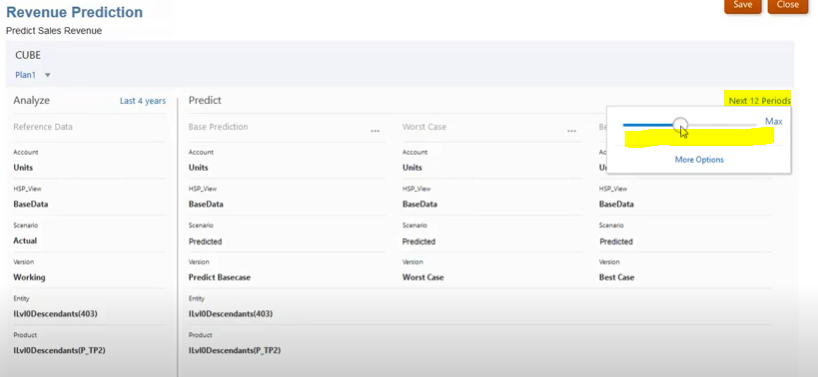
Step 7: In the Predict section, specify how far you want prediction results to be calculated. Click Select Start Period and choose a method:
- Slide the slider to the number of periods you want to predict, up to a maximum of 48 periods. The default is six periods
- To define a fixed date range, click More Options, and then select the Start Period, End Period, and Number of Periods.
- To define a scenario-based date range, click More Options and then click Use a scenario-based date range. Then select the Scenario to use, the End, and the Number of Periods. For End, you can select a fixed period date for the end of the predictions, or base it on the end date of the selected scenario.
Optionally, to include Best Case and Worst Case results in the prediction results, click plus sign on the right side of the Predict area and then click Best Case and Worst Case. Then select members for the dimensions. Note that you can select members only for dimensions with single member to single member mapping. Dimensions with multiple member selections and unmapped dimensions use the same selections for Best Case and Worst Case prediction results.
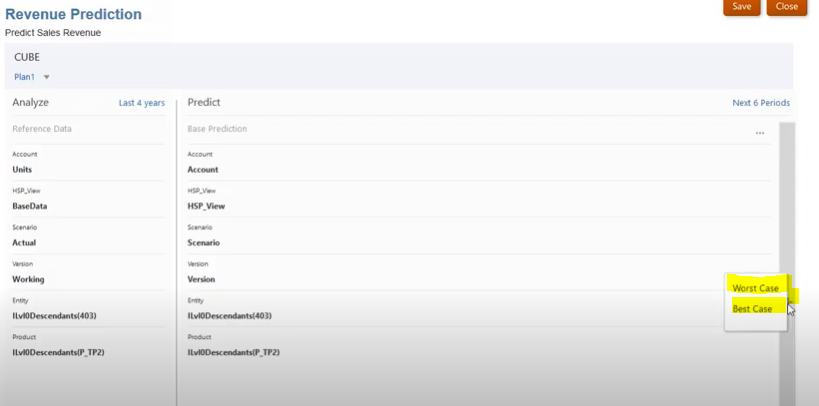
Step 8: Optionally, to include Best Case and Worst Case results in the prediction results, click plus sign on the right side of the Predict area and then click Best Case and Worst Case. Then select members for the dimensions. Note that you can select members only for dimensions with single member to single member mapping. Dimensions with multiple member selections and unmapped dimensions use the same selections for Best Case and Worst Case prediction results.
Step 9: Click Save to save the prediction definition.
Step 10: After defining the Auto Predict prediction, you can run the prediction from the Auto Predict page, or you can schedule a job to run the prediction automatically.
Steps for Running Auto Predictions:
You can run an Auto Predict prediction definition from the Auto Predict page, or you can schedule a job to run the prediction automatically.
- From the Home page, click Application, then click Overview, and then from the Actions menu, select Auto Predict.
- From the Auto Predict list, click Actions next to an Auto Predict definition, and then select Run. For Auto Predict predictions with a large number of cells to calculate, in Run Parameters, select a dimension and then click Run Now.
- To review a summary of the prediction, click the job status in the Last Run column on the Auto Predict page. Or, review details in the Jobs Console: click Application, then Jobs, and then click the prediction definition name on the Jobs
Steps for scheduling a job (Auto Prediction):
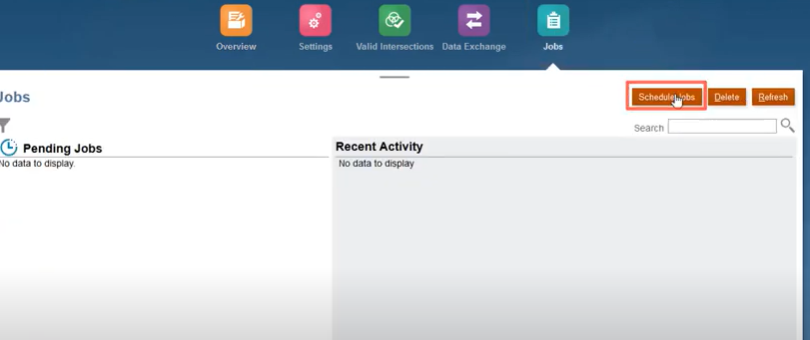
Step 1: From the Home page, click Application, then Jobs, and then click Schedule Jobs.
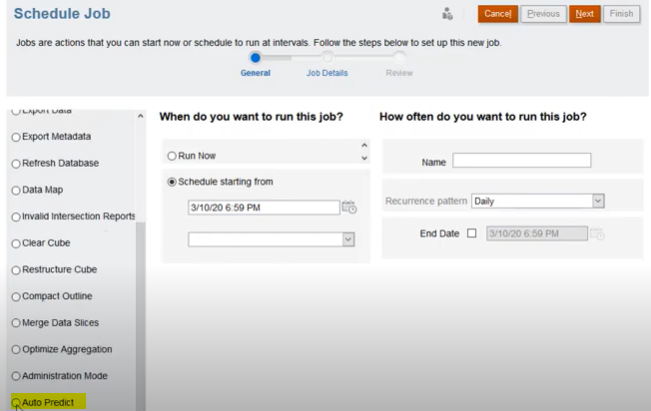
Step 2: For What type of job is this, select Auto Predict. You can run it now, or schedule it to run either one time or on a recurring basis.
Step 3: Specify options for When do you want to run this job? and How often do you want to run this job? and then click Next.
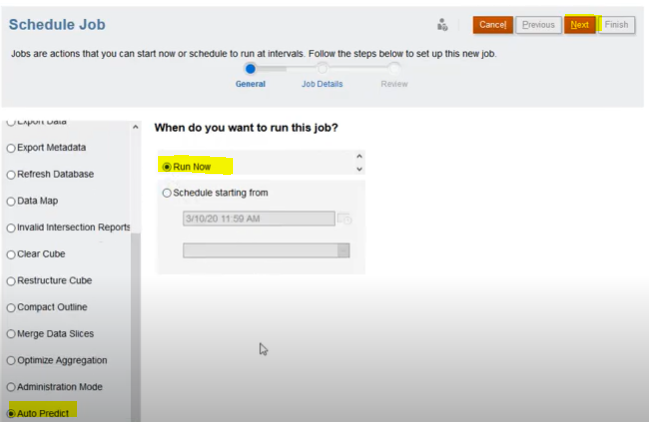
Step 4: Select the Auto Predict definition to run and then click Next. For Auto Predict predictions with a large number of cells to calculate, in Run Parameters, select a dimension and then click OK.
This setting is used to speed up an Auto Predict job by running predictions in parallel in separate prediction threads. For these parallel jobs to be efficient, choose a dimension that will result in evenly spread data for each prediction thread. For recurring jobs, the selected dimension is used for jobs until you change it.
Step 5: On the Review page, review the Auto Predict job and then click Finish.
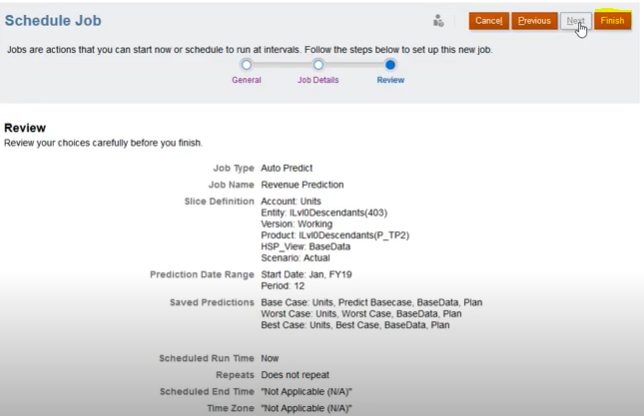
Step 6: On the Jobs page, you can refresh to update the job status and confirm that the job completed successfully.
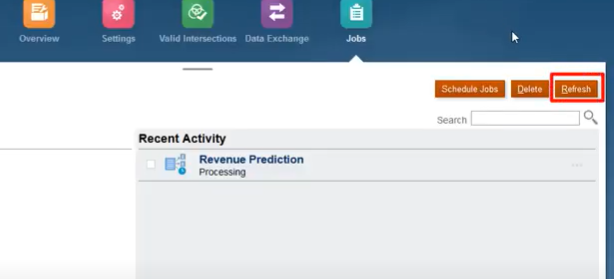
Step 7: Click the job name in the Recent Activity list to review a summary of the prediction results.
Before running a scheduled prediction job, Auto Predict analyzes certain factors to determine if prediction results would change. If the prediction results would not change, the Auto Predict job is not run. For example, if the historical range was set for the last three years and there has been no change in the start period/year for prediction, the historical data for analysis would be the same and the prediction results wouldn’t change. In this case, to optimize performance and prevent unnecessary jobs from running, the Auto Predict job is skipped. A message is displayed indicating that the job will not run. If you want to run the prediction anyway, you can run the job from the Auto Predict page.
Reviewing Reports for Auto Predict Predictions:
- From the Home page, click Application, then click Overview, and then from the Actions menu, select Auto Predict.
- On the Auto Predict page, from the Actions menu next to the Auto Predict definition, select Download Report.
To download the report from the Outbox:
- From the Home page, click Application, and then click Overview.
- From the Actions menu, select Inbox/Outbox Explorer.
Look for AP_JobName.zip and download the file.


